A week or so ago, my 4 year old got invited to a birthday party for one of her dance friends. As per usual, I offered to do a cake for her as a gift, because I just love being able to bless people. Especially with cake. I mean, what better gift can you give than one that is loaded with sugar?
The theme of this party was butterflies. Her mom sent me this pin from pinterest for inspiration:
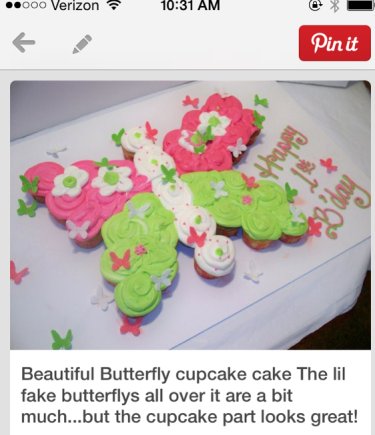
I agree with whoever wrote the description–the mini butterflies are overkill. Plus, they don’t even make sense. Why would a butterfly have other butterflies all over it? And what’s with the ginormous daisies (?) on the wings? Probably the cake decorator was just trying to jazz up an otherwise boring design. Needless to say, I was not very inspired by this picture. What I took from it were the two most important requests: they want a cupcake cake in the shape of a butterfly and they want the color scheme to be pink and green. Pink and green is my least favorite color combination. But, this is not my cake! The birthday girl wanted pink and green, so I was going to give her pink and green.
After a Google search for pink and green butterflies, I saved these two to base my design off of:
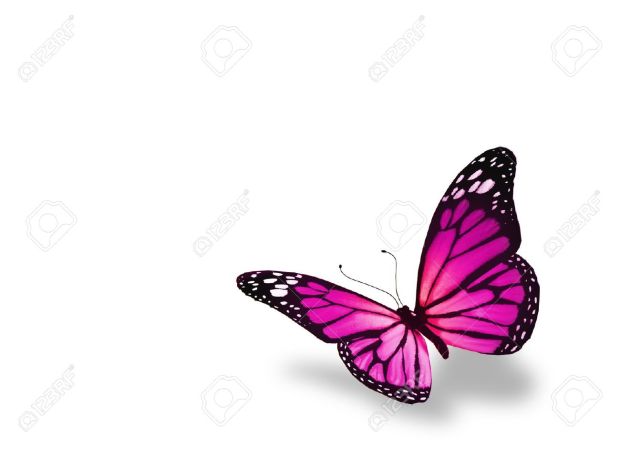

I loved the color gradient in both of these, and knew that would be the best way to blend the pink and green together. I decided to do a light pink, a dark pink, a light green, and a dark green, to give it a smooth transition.
To make this cake I used:
I made an exciting discovery through making this cake–foam craft boards do not absorb the oil from the frosting, and therefore do not get grease marks! Plus they come in different colors and are much larger than your average cake board, which is ideal for cupcake cakes. But since they are so large, be sure to measure the width and length of your fridge shelf and cut that bad boy down to size with an X-Acto knife before you start building your cake.
First thing is to color your frosting.
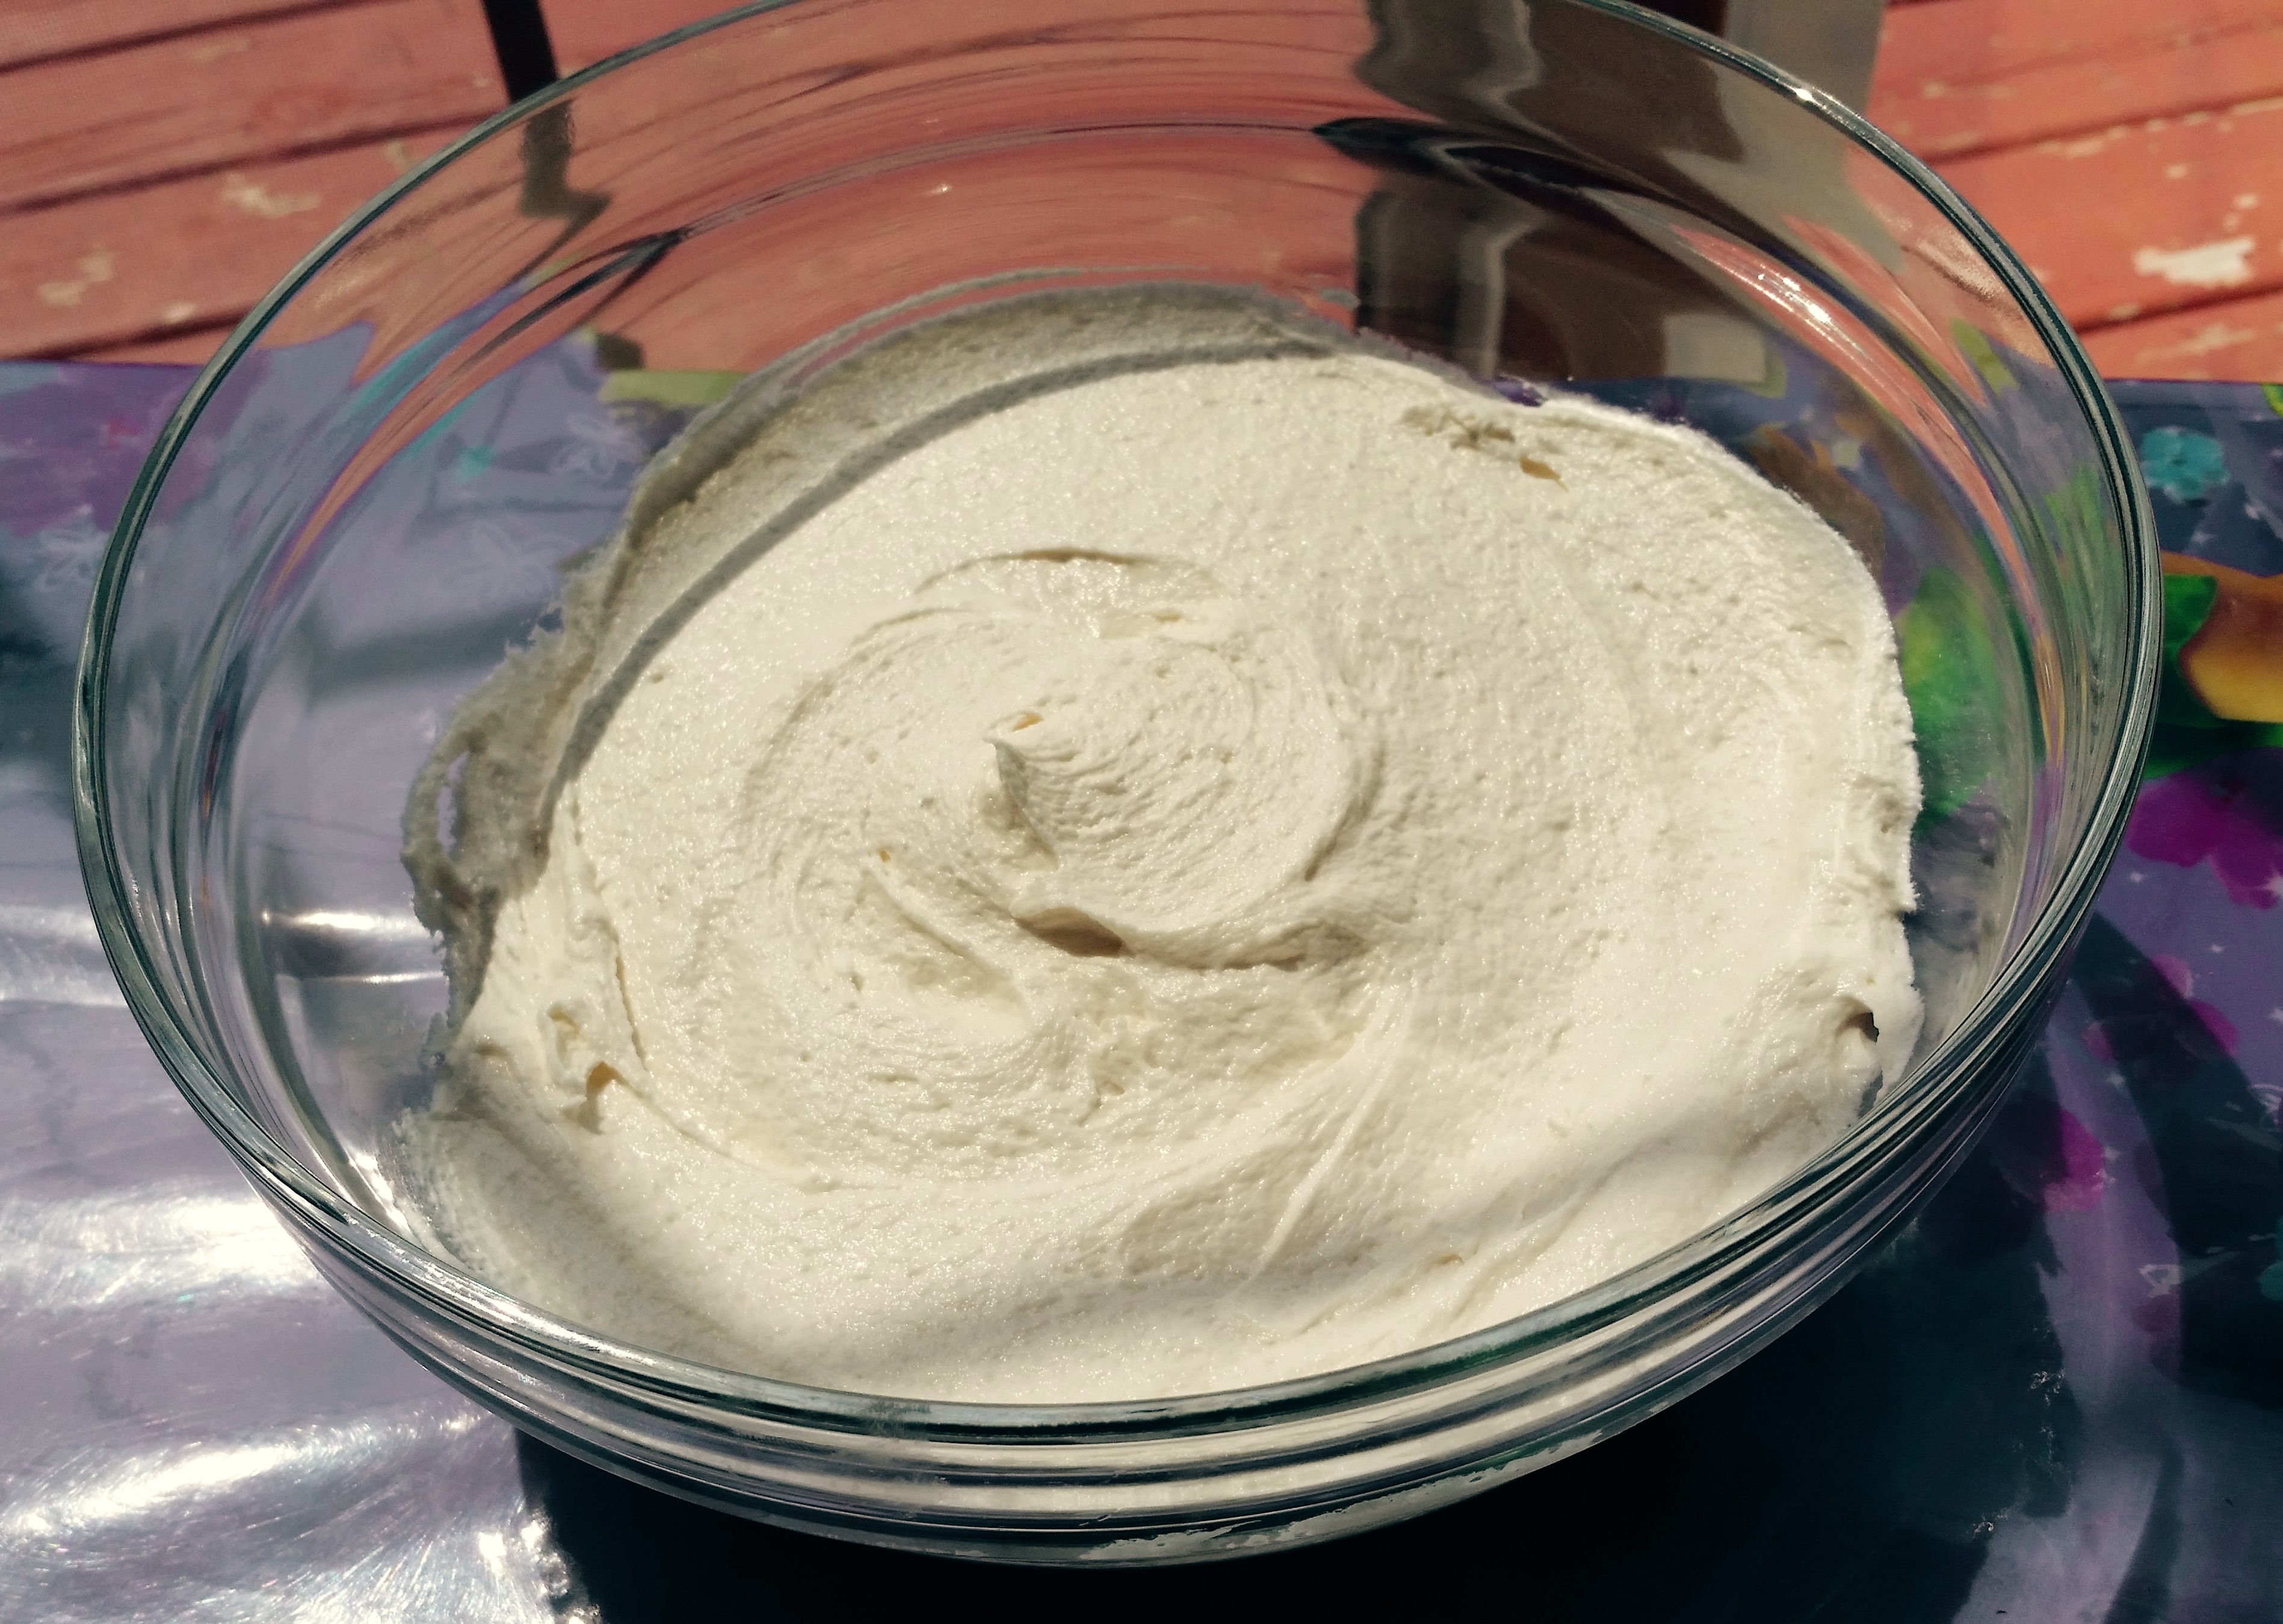
Take your first batch of vanilla frosting and divide it in half and separate into two different bowls. Using a toothpick, add a little bit of pink gel color to one bowl and mix it in to get a light pink. Again using a toothpick, add pink gel color to the other bowl of frosting, but this time add just a smidge more so that you end up with a darker pink. Adjust both colors until you are happy with them, but be careful not to add too much gel color. You can always add a bit more to darken it, but you can’t take any out if you add too much and need to lighten it.
Take the second batch of frosting, repeat the process, this time using green gel color.
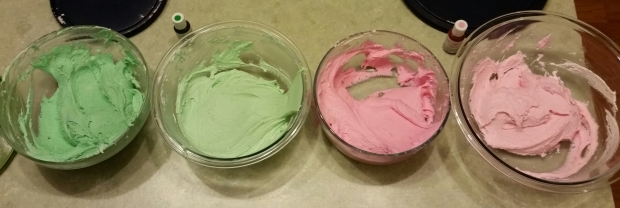
When you’re done, you should have a nice gradient of color ranging from light pink to dark green.
Take your third batch of frosting and scoop about a quarter of it into a clean bowl. Then add some black gel color and mix it in. It takes quite a lot of the gel color to get a nice black, so don’t bother with the toothpicks on this one; just squeeze big drops in until you’re happy with the tone of black.
For the veining detailing on the wings, I decided to use grey, because I thought black would be a bit harsh. In retrospect, I think white would have been the best pick. If you want to use grey like I did, then take another quarter of that last batch of frosting and color it grey using a toothpick and the black gel color. If you want to do it in black, then instead of coloring a quarter of a batch above, color half of the batch black. If you want to do it in white, then obviously, don’t do anything to it.
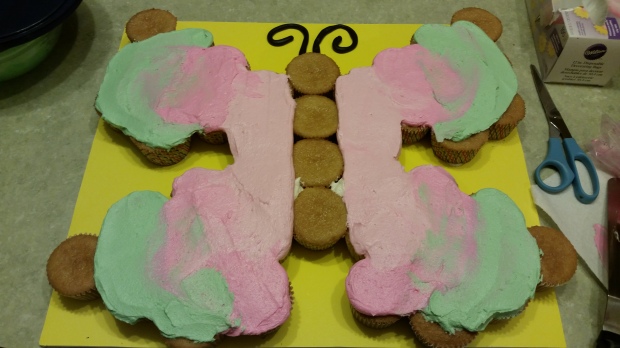
Once all your frosting is tinted, it’s time to put the cake together. If you haven’t already cut your foam board down so that it will fit in your fridge, do that now. Since the board is so thick, I found it was easiest to score the board to get through the first half of it, and then go over the line with the X-Acto again to cut all the way through.
Then, assemble your cupcakes. Don’t attach them with frosting just yet; you’ll want to be able to move them around until you get the shape just right.
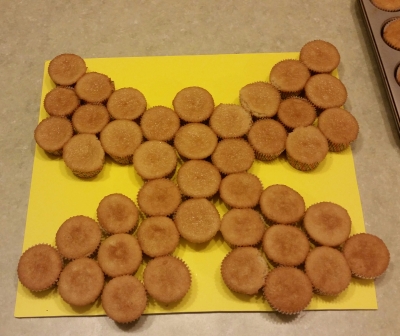
Once you’re happy with your shape, carefully lift the cupcakes one by one and put a dollop of white frosting on the bottom and then reattach to the board. After you’ve done this to all of the cupcakes, fill in the gaps between cupcakes by piping white frosting directly into the holes. You don’t need to do this in between every single cupcake. Just fill in the larger holes so that when you’re frosting the “cake” the frosting won’t fall in between. You want to give the illusion that the top is one surface, so it has to be level and smooth.
Then you need to let it sit in the fridge for 20 minutes so that the frosting can harden. This is a really important step so that the cupcakes don’t slide around on you.
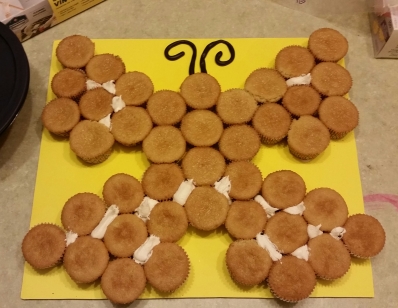
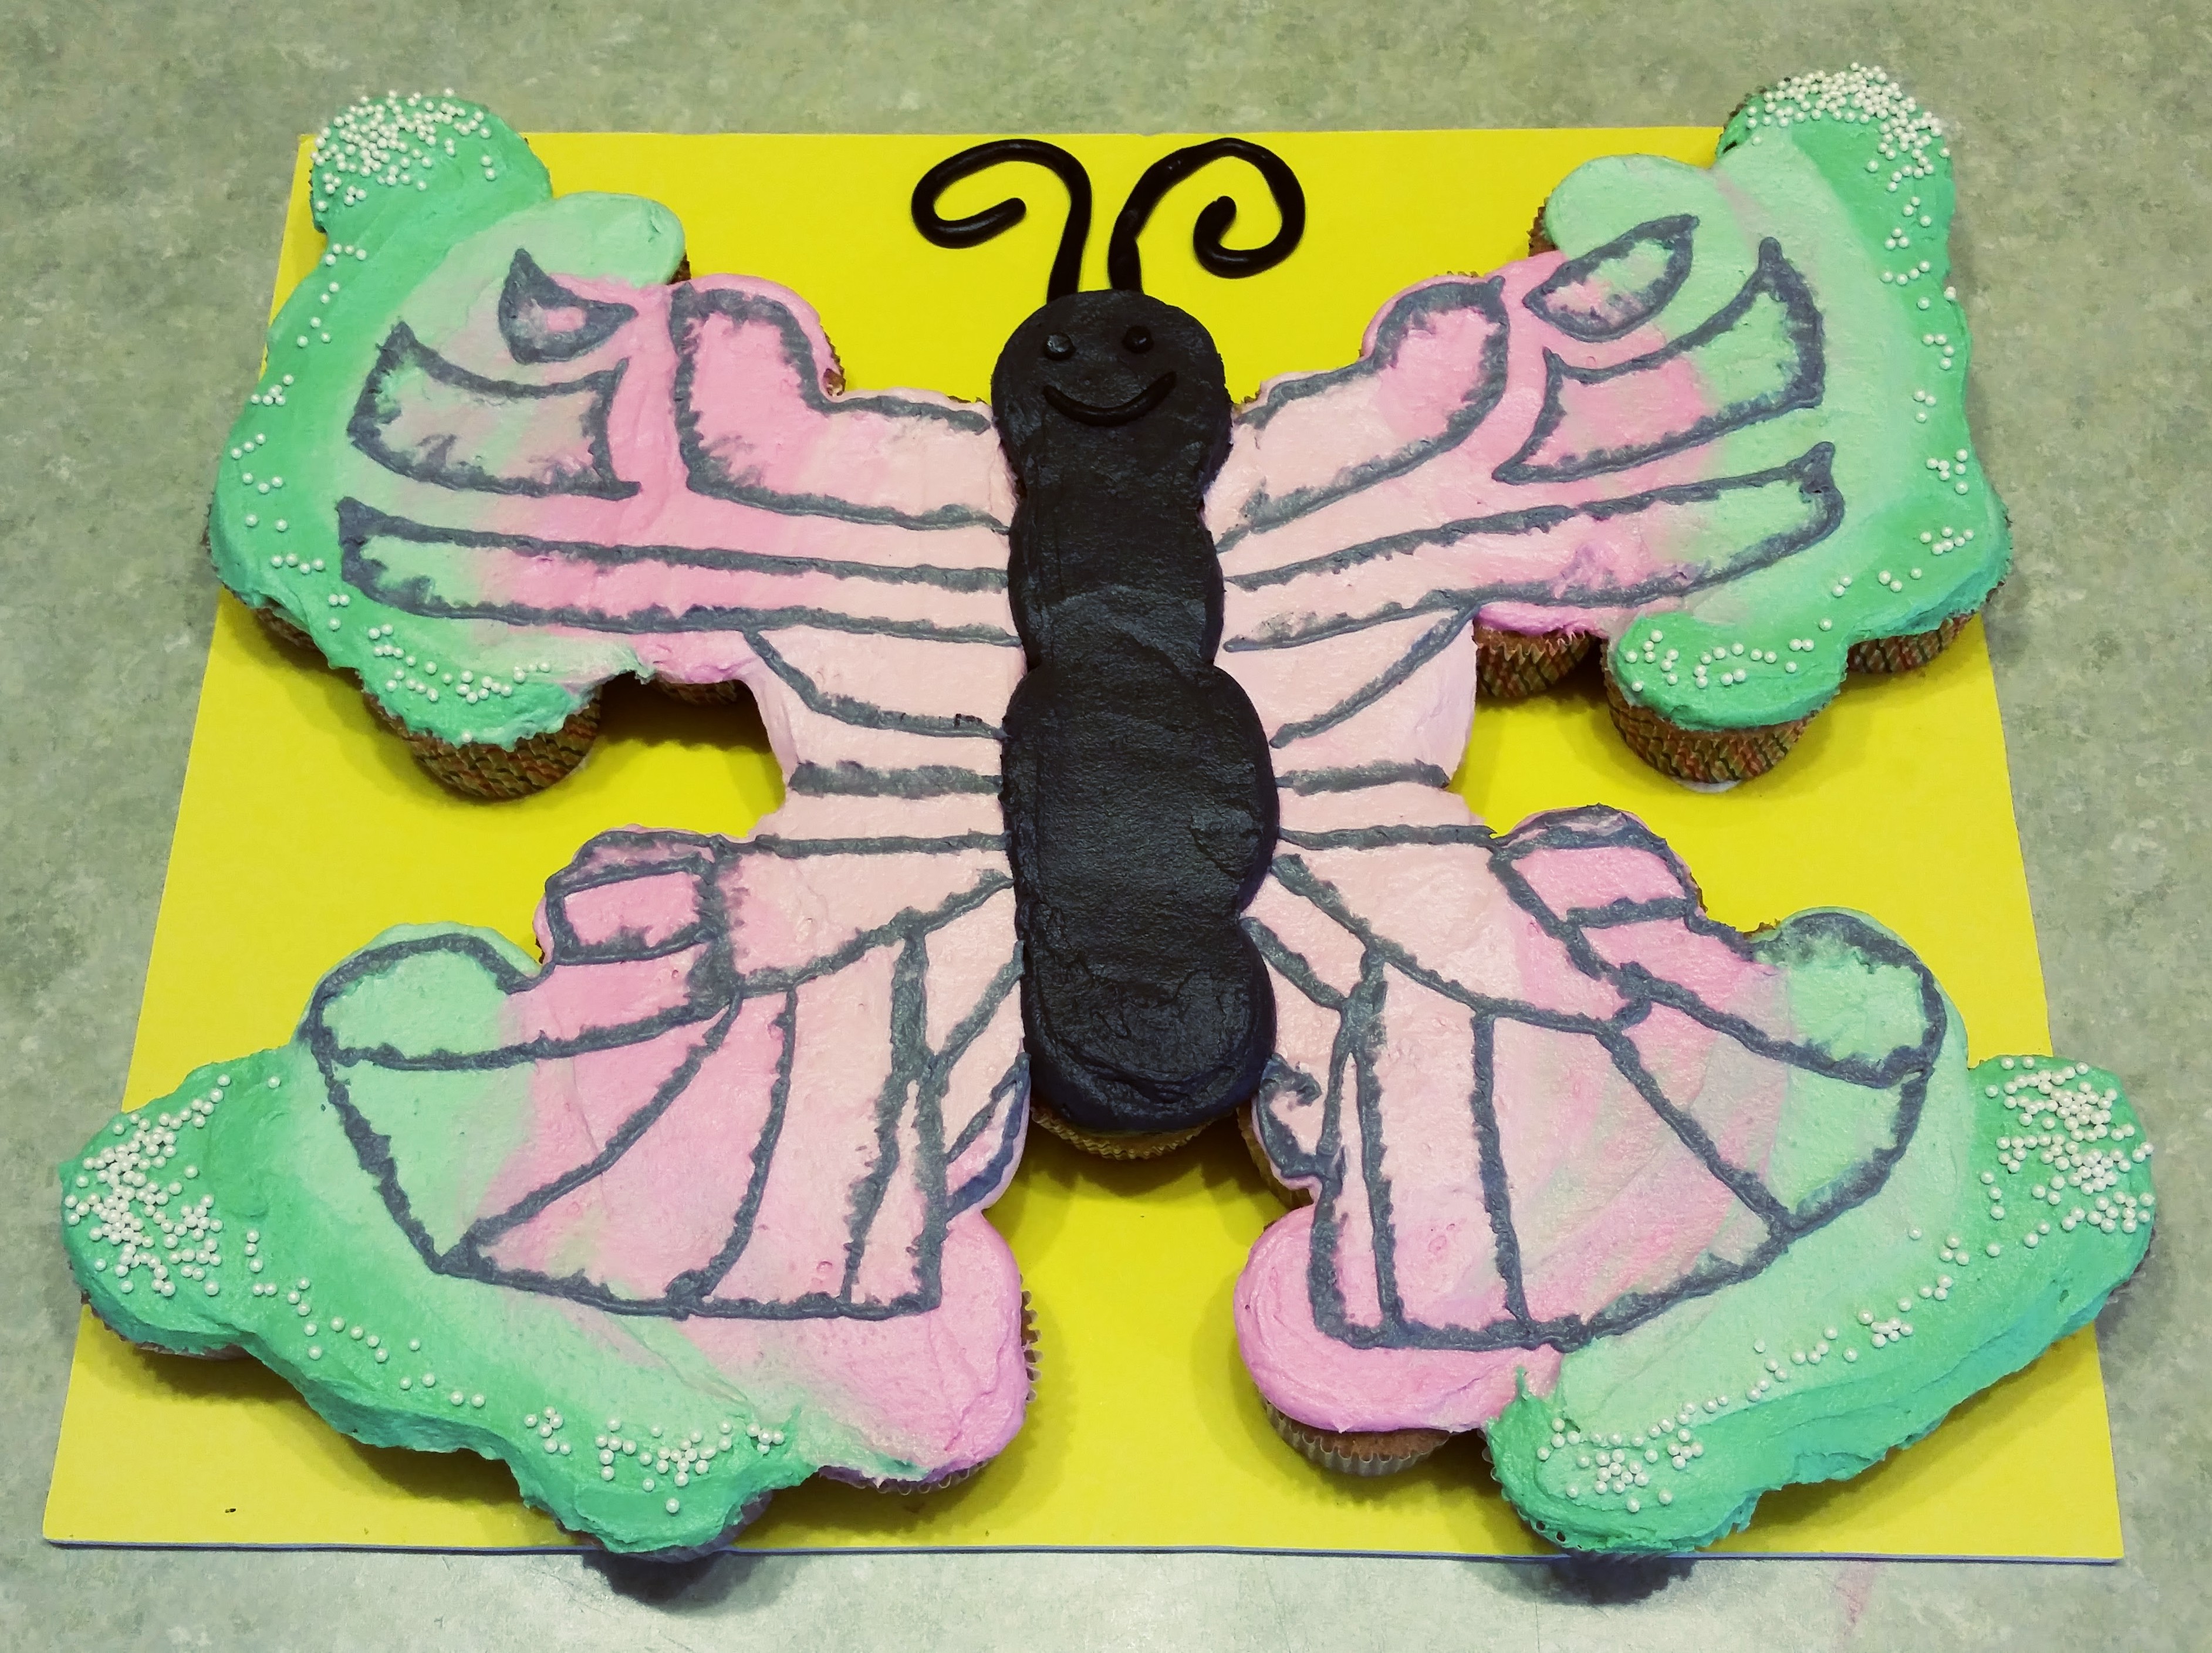
While it was setting up in the fridge, I worked on the fondant pieces. I already had white marshmallow fondant on hand that I had made a couple weeks back, so I took some of that out and colored it black with the gel icing color. To do this I took a toothpick and dipped it into the gel color, then wiped the toothpick on the fondant. Then I kneaded it like a dough until the color was evenly distributed. Even though it was only a small amount of fondant, it still took forever to knead all the black in! Helpful tip–wear disposable gloves while doing this so you don’t stain your hands. Once it was black, I took a bit of fondant and rolled it in between my hands to make a long tube for an antenna. When I was happy with the thickness and length, I laid it out on the board to come out of the butterfly’s head. Then I repeated that process, trying to match the second antenna to the first as best I could. Since this was for a kid’s birthday, I decided to give the butterfly a face. Using a #5 Wilton decorating tip, I punched out eyes. Then I rolled out a little smile with my hands. I set the eyes and smile on a plate while I worked on the rest of the cake.
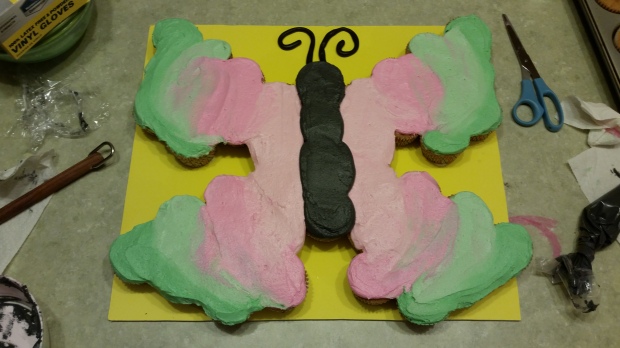
Once the frosting is set, it’s time to decorate. I started with the wings, so that if any of the frosting accidentally got smeared on the butterfly’s body I could just cover it up later. I put the light pink frosting in an icing bag, but didn’t bother with a tip; I just cut the end of the bag. I was using the piping bags so that I could better control where I placed the frosting, but ultimately was going to smooth over it with a spatula, so it didn’t need to be super precise. Then I piped columns of frosting up and down the two columns of cupcakes closest to the butterfly’s body. I covered the next “column” of cupcakes with the dark pink frosting.
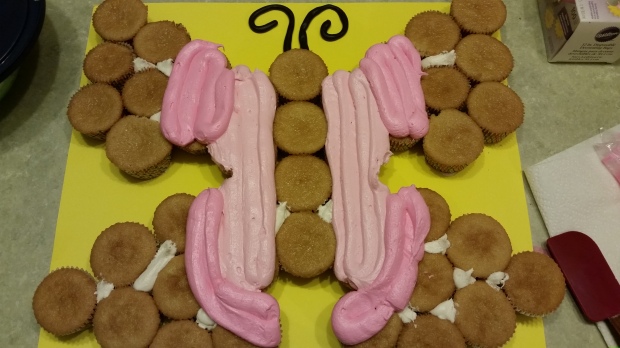
Then I took my offset spatula and starting at the body of the butterfly, slowly smoothed out the frosting. You’ll have to do it a couple of times, so be sure to wipe the spatula clean before going over it again so the dark pink doesn’t get mixed up in the light pink.
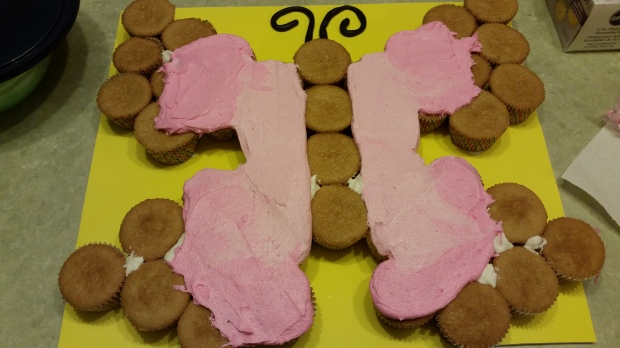
Once the pink is smoothed out, get your light green frosting and pipe it onto the next column of cupcakes. I wanted the pink to bleed a bit into the green, so when I went to smooth it out, I started in the dark pink and dragged it into the light green. It took a few strokes and you don’t want too much pink in the green, so be very careful to wipe the spatula clean each time.
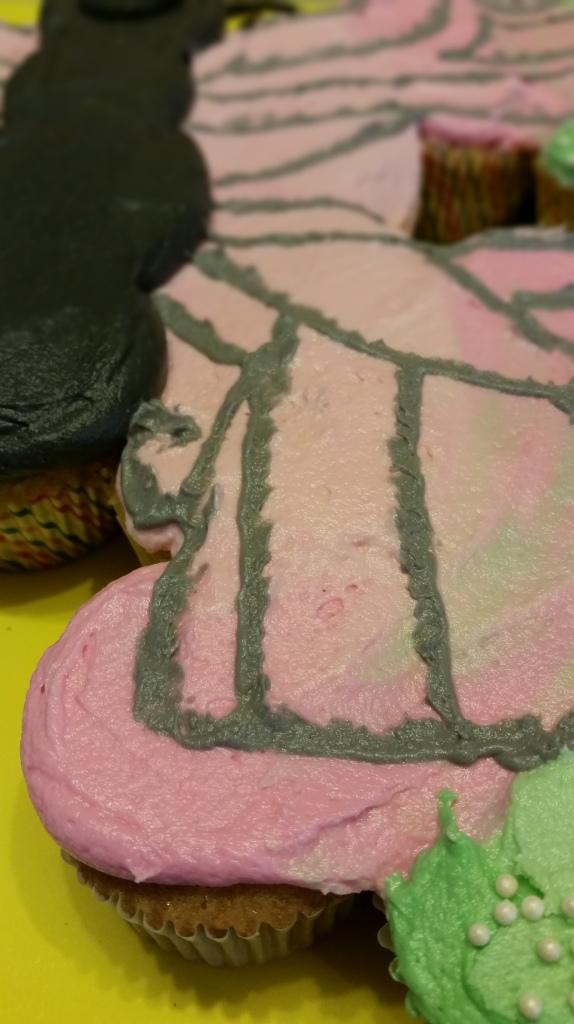
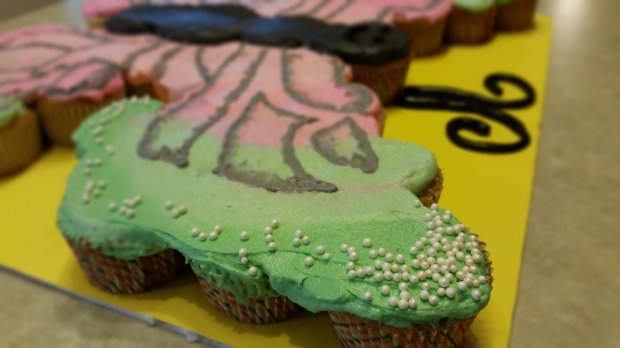
Finally, pipe on the dark green on the remaining cupcakes to make the wing tips of the butterfly. Since the dark green has the least amount of surface area, I didn’t want too much of the light green to bleed into it. Use extreme caution on this last smooth out. Then take the black frosting and pipe it onto the body of the butterfly. Smooth it out with your spatula, being really careful not to get any of it on your beautiful wings. You can put the fondant eyes and mouth on at this time.
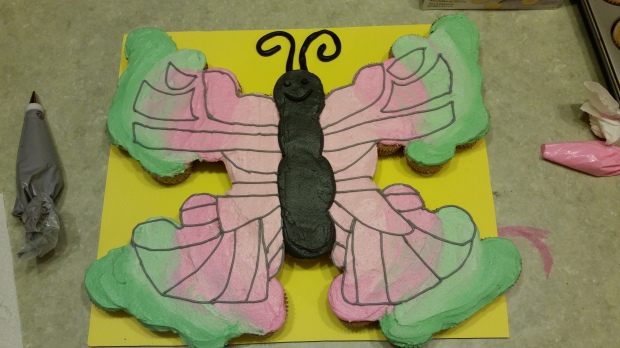
Using my butterfly pictures as a guide, I took a piping bag that was filled with the grey frosting and fitted with a #2 tip, and piped the veining. I’m right handed, so the right side was easier for me to do. The left side did not come out perfect, but since I was using regular frosting, I couldn’t just peel it off and try again like I can with royal icing, because regular frosting doesn’t harden the way royal does. Due to all of my kids being sick with colds and ear infections (and actually having to take our 2 year old to the ER because it got in her chest and she was having a hard time breathing), I had to do all of the decorating for this cake the night before the 11 am party. Thankfully, the baby allowed Daddy to hold her so she actually slept, allowing me to bang this bad boy out. Needless to say, I didn’t have time to make royal icing so I had to use regular frosting. If you have the time, I would highly suggest using royal icing for the veining. It’s much more forgiving.
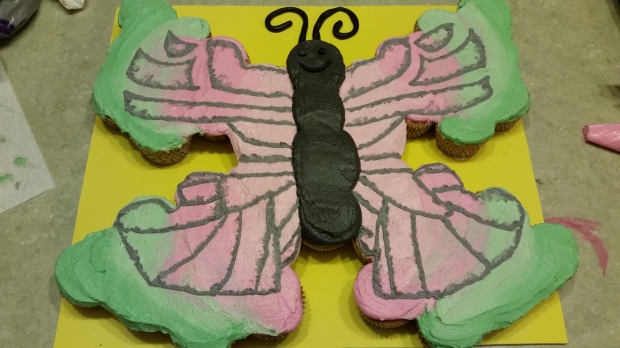
It looked a bit harsh to me like this. So in the haze of 1 in the morning logic, I decided to try a new technique: brush embroidery. Please note that this was really stupid, and I do not in any way endorse trying new things at the eleventh hour when you have no time to fix any potentially catastrophic mistakes. But that’s just kind of how I roll. I’m a perfectionist, and if something doesn’t look exactly right, I can’t just leave it. Since it was soft frosting on top of soft frosting (this technique is supposed to be done with royal icing), I thought using an actual paint brush would blend the grey frosting into the pink and green too much. So I chose to use the tip of a toddler butter knife instead. To do the effect, you simply put the brush (or knife, in my case) and place it on a spot of the line. Then you gently pull the frosting, giving it a brush stroke look. Repeat a gazillion times until every inch of grey frosting has been brushed.
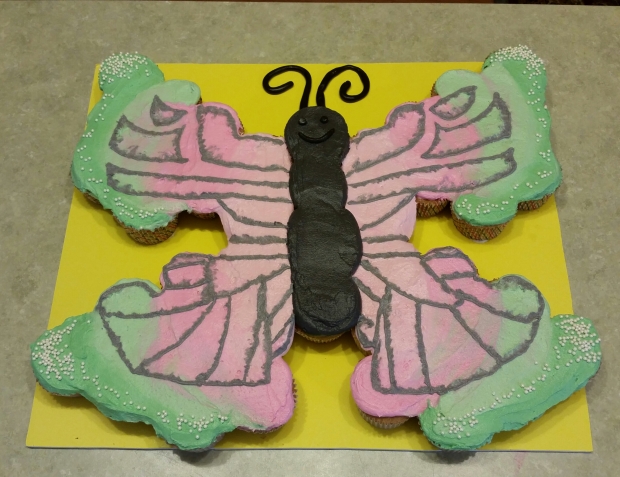
My gamble paid off, and it gave the effect that I was looking for! I like to think that it gives the wings the illusion of fluttering. It took forever to do, but I feel it was well worth it.
To finish it off, I placed white nonpareils on the wing tips.
There you have it! A beautiful ombre butterfly cupcake cake.
The birthday girl was very happy, and her mom called it, “Stunning!” I was very happy with the way it turned out and really enjoyed putting it together. If any of you try your hand at this cake, please share pictures of how yours came out!


